How To: Unroot & Relock Your Modded Nexus 5 Back to Factory Condition
Okay, so you're rooted and need to return your Nexus 5 to its stock firmware. Whether it's because you need to send your phone in to the manufacturer to fix a defect or you just want to use the device's over-the-air updating feature, unrooting and returning your Nexus 5 back to its fresh-out-of-the-box state is a fairly simple process with the right tools. Please enable JavaScript to watch this video.
Step 1: Connect Your Nexus 5 to a PCPlug your Nexus 5 into your Windows PC using any USB cable. Make sure the cable you're using has no visible damage to either connector and that it plugs in firmly to your phone, as an accidental disconnect during this procedure could lead to a bricked device.
Step 2: Enable USB DebuggingIn order to get access to this setting, we'll need to unlock the Developer Options menu. To do that, head to Settings, then About Phone. Scroll down to the bottom of this list and tap Build Number 7 times in rapid succession. Note: Take this opportunity to jot down your Build Number, it will come in handy later.From here, back out to the main Settings page and tap Developer Options. Tick the box next to USB Debugging, then select OK from the dialog that appears next.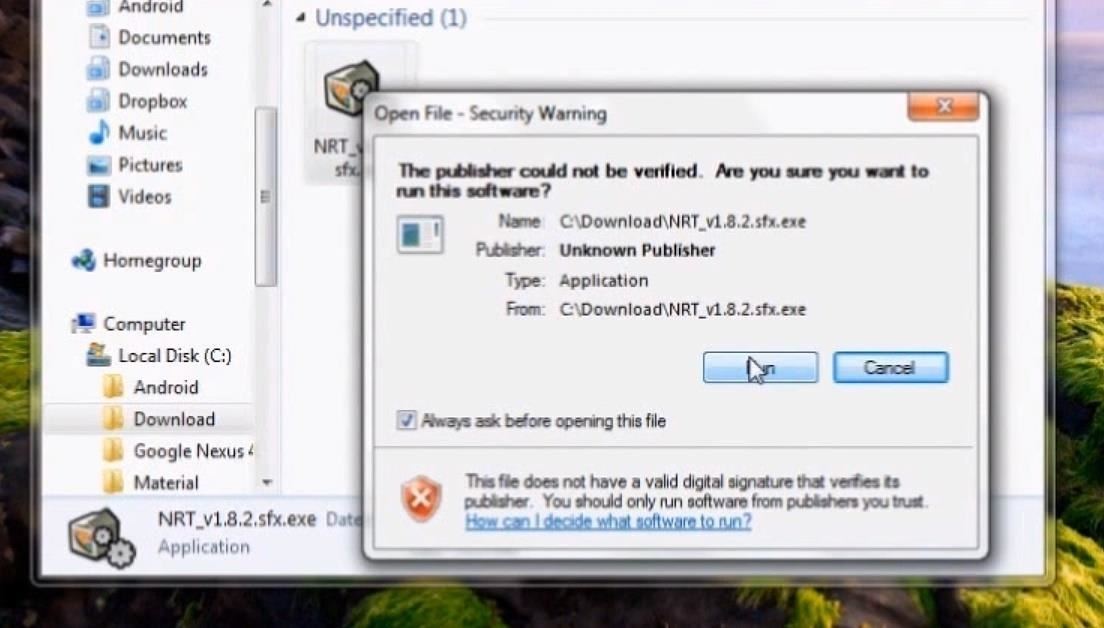
Step 3: Install Nexus Root Toolkit on Your PCFrom your Windows PC, click on this link to download the install file for the Wugs Nexus Root Toolkit app. This is version 1.8.2, but you can always get the latest version on the WugFresh website.Once the download has finished, install by double-clicking the file in your browser's download folder. Click Run on the following window. Follow the prompts for installation, allowing the toolkit to download additional files when it asks.
Step 4: Allow USB DebuggingAs the installation process finishes on your PC, a dialog will appear on your Nexus 5 asking you to allow USB debugging access from the computer you're connected to. Tick the box next to Always allow from this computer and press OK.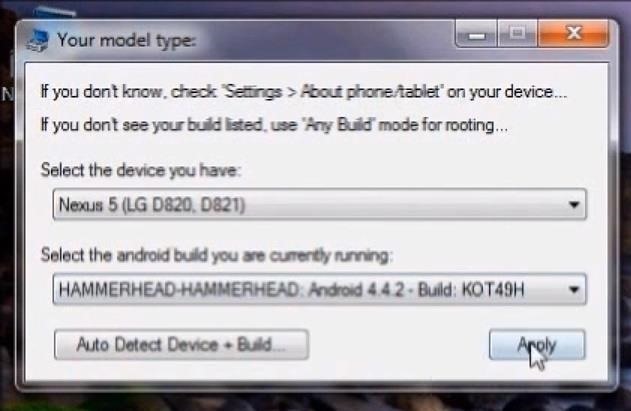
Step 5: Set Up the Root ToolkitWhen the installation is complete on your PC, you will be prompted to enter your phone's Model and Android Build. Enter Nexus 5 as the model, and refer to the build number you jotted down in Step 2 for the Android Build. Next, click the button labeled Full Driver Installation Guide - Automatic + Manual near the top-right of the toolkit's main screen. Follow the instructions provided by the toolkit to install the proper device drivers. On the "Step 3" tab in the dialog box that appears, take note of the Recommended Solution it provides and install the corresponding set of drivers.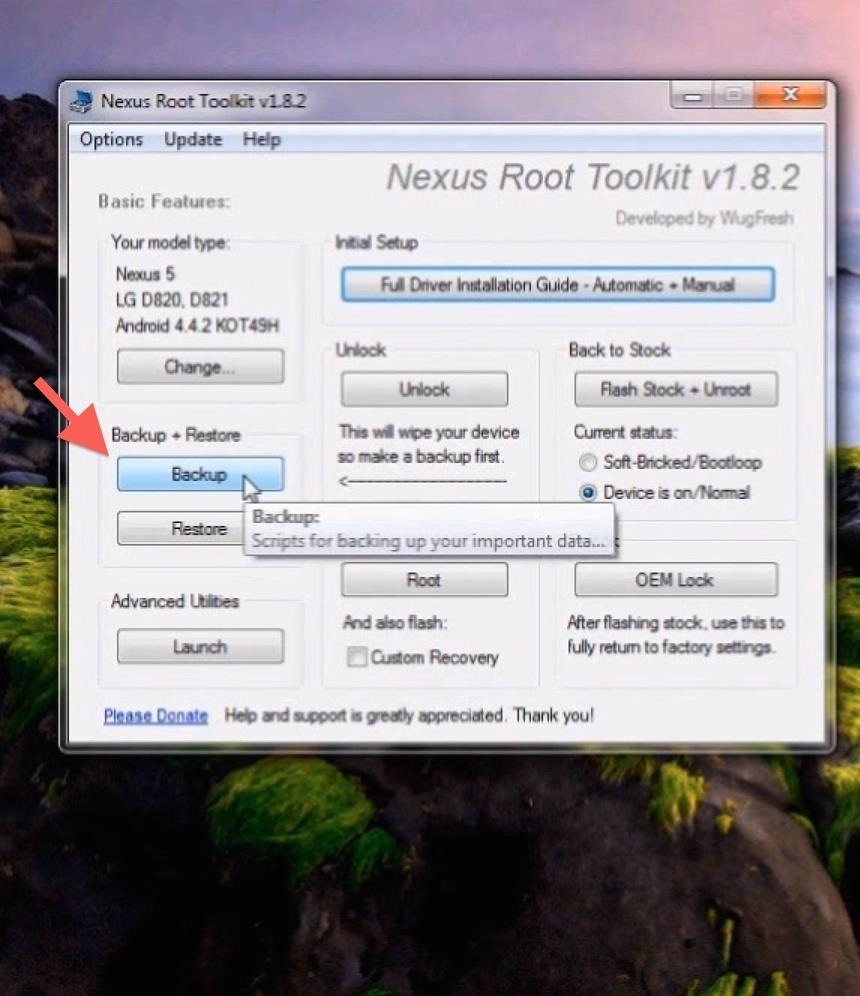
Step 6: Back Up Your Data and Apps (Optional)As you probably remember, the process of unlocking your Nexus 5 deletes all of your phone's apps and data. The same applies when re-locking and returning to stock.There are several methods available to back up your data, but most won't be able to restore anything without root or a custom recovery. The best option to back up your music, photos, videos, and other data is to copy them to your PC temporarily using Windows Explorer. When you have returned to stock, you can then copy these files back to your phone.For backing up apps, however, there is an automated option provided by the Nexus Root Toolkit. Simply click Backup from the toolkit's main menu, then select Create Android Backup File on the following screen. Follow the toolkit's instructions through the backup process. Be sure to note the save location of the backup file so that you can find it when it comes time to restore.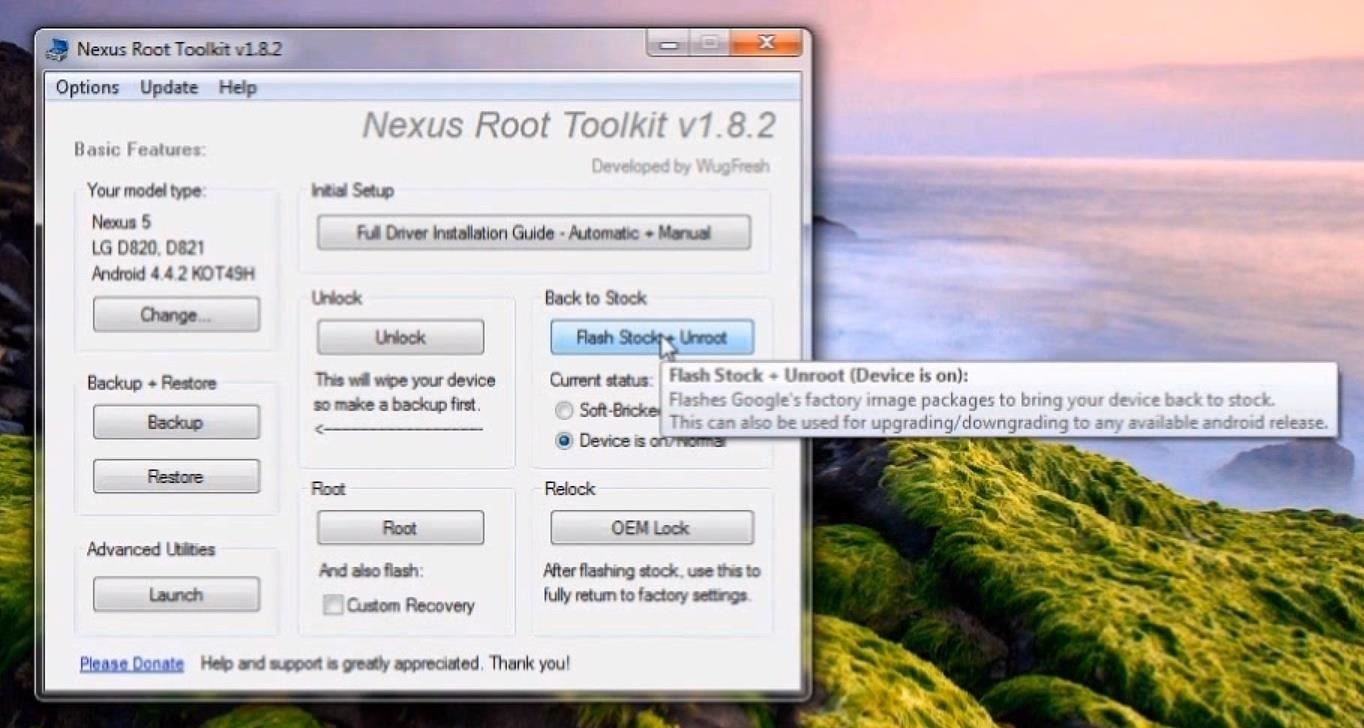
Step 7: Flash the Stock FirmwareBefore proceeding, remember that THIS PROCEDURE WILL DELETE ALL APPS AND DATA FROM YOUR PHONE.From the main menu of the toolkit, select Flash Stock + Unroot. Press OK to continue, and on the following screen, make sure Automatically download + extract the factory image selected above for me is selected. Click OK, then follow the instructions to flash the factory images. DO NOT DISCONNECT THE USB CABLE DURING THIS PROCESS.
Step 8: Enable USB Debugging AgainNow that you've flashed the stock firmware, all of your previous settings have been reset. This includes the USB Debugging option we enabled earlier, so refer back to Step 2 of this guide to enable it once again.The dialog on your Nexus 5 asking to allow your computer to connect should appear right away this time. Tick Always allow from this computer and select OK again.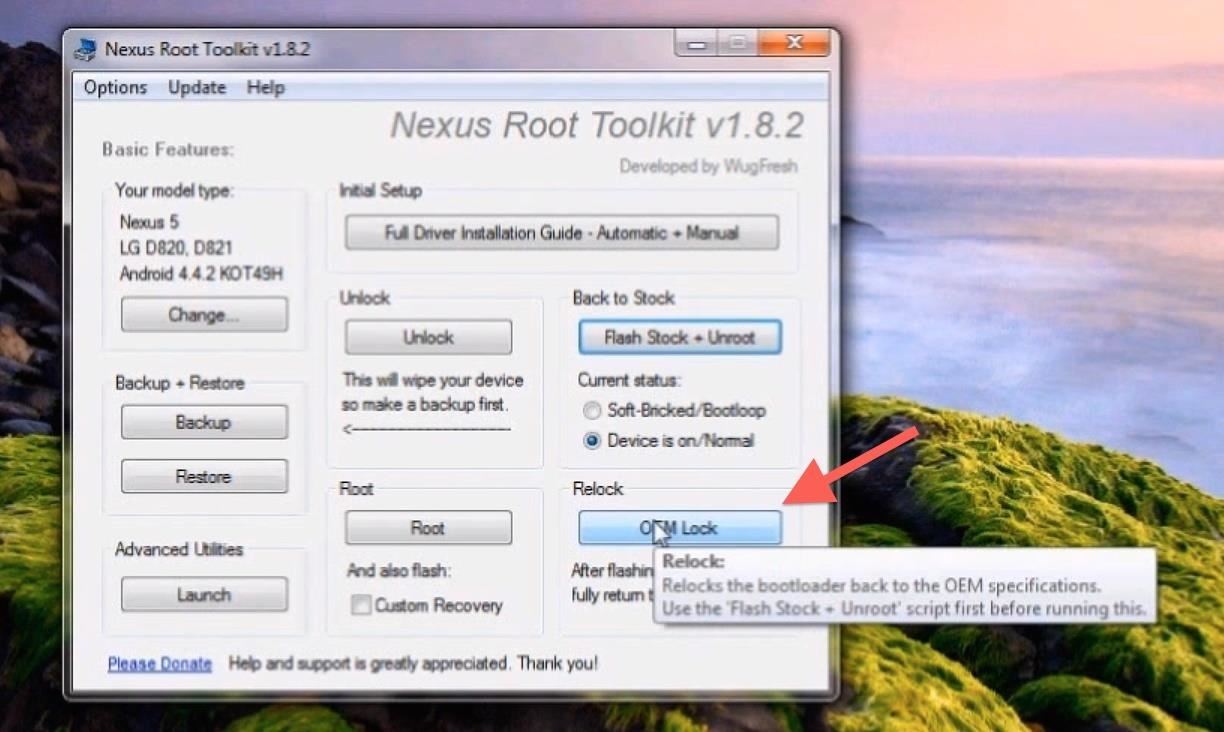
Step 9: Lock the Bootloader & Reset the Tamper FlagNot only will this part of the process put the bootloader back into its original state, but it will also destroy any evidence of the phone having been modified in the first place. This is important if you are returning your phone to the manufacturer or your wireless carrier for warranty purposes.From the main menu of the toolkit, select OEM Lock, then OK from the following prompt. This process will automatically reboot your phone several times, so be patient.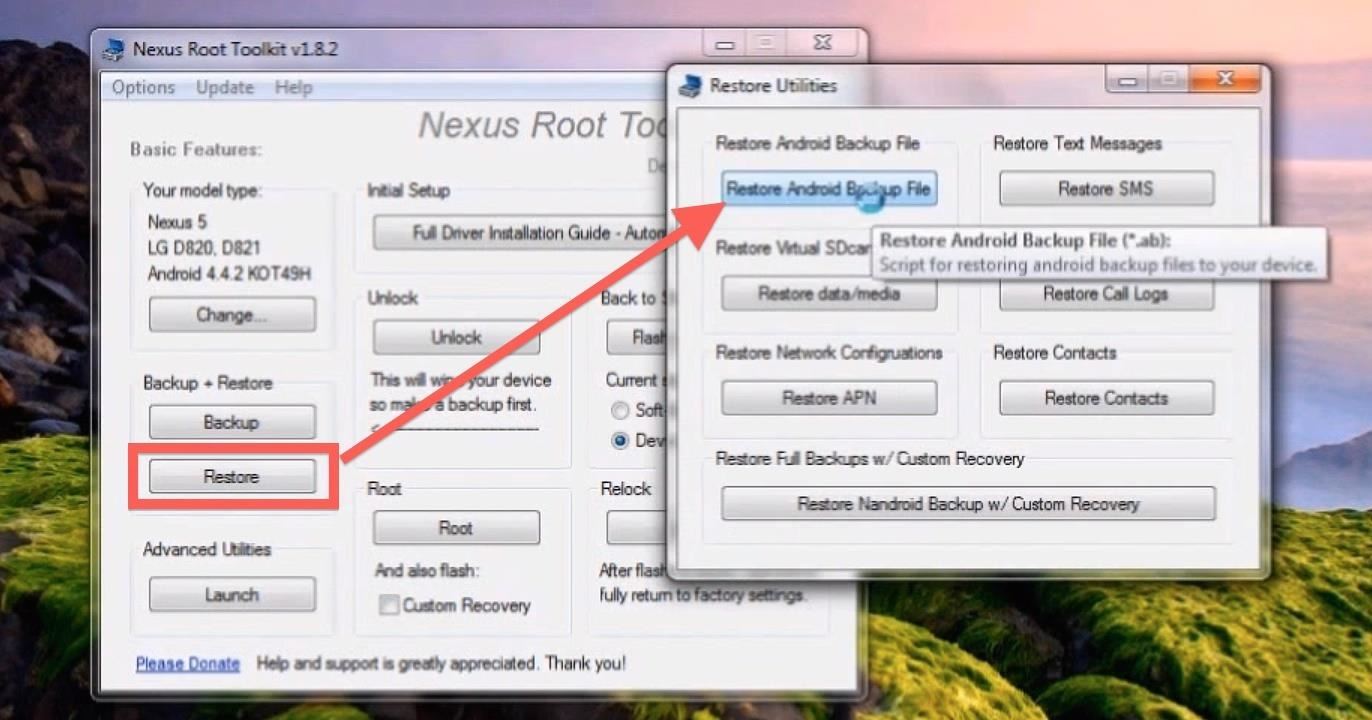
Step 10: Restore Your Backups (Optional)At this point, it's safe to go ahead and restore any backups you've made. If you copied any data to your PC, you can now copy that back to your Nexus 5.To restore any apps you backed up with the toolkit, click Restore from the main menu, then Restore Android Backup file from the next screen. Follow the toolkit's instruction to complete the process.
Savor the Stock FlavorYou should now be holding a completely stock Nexus 5. Your phone is now ready to be sent back to the manufacturer or carrier if need be. Otherwise, enjoy your fresh-out-of-the-box device.New Nexus 5 image via Phandroid
How to Make a Handheld Portable Nintendo 64 N64 Gaming Console - INto64: Ever wanted to make your Nintendo 64 (N64) gaming console into a handheld portable unit for "on the go" playing?This system runs off Li-ion batteries which are powerful enough to run the system, and are also rechargeable cells.
Nintendo 64 Portable Handheld Diy Guide - Part 1 - Basics
Session hijacking is possible because of limitations in TCP/IP, which cannot be easily fixed due to how widespread and entrenched it is. Instead, security layers are added on top of this tech to limit and nullify the threat. Most session hijacking methods focus on two aspects: the SessionID and the session sequence number.
The WiFi Pineapple - Using Karma and SSLstrip to MiTM secure
We've described easy ways to free up space on your iPhone or iPad but that may not be enough for those who store a lot of data on their iOS devices. It's why we recommend that you pay a little
How to Free Up Space on iPhone (& Never Worry About - YouTube
In this video, I'll be showing you two methods you can use to swap the placement of the "Back" and "Recent Apps" buttons on your Nexus 6P. The first is a flashable ZIP, which can be installed with
Swap the "Back" and "Recent Apps" Buttons on Your Nexus 6
Install the Android 5.0 Lollipop Messenger App on KitKat
Close All Chrome Tabs Simultaneously on Any Android or iOS
Examine the Ring / Silent switch on the left-hand side of your iPhone. If the switch is pulled towards the back of your iPhone and you see a small orange line, your iPhone 8 is on silent. To turn the ringer on, pull the Ring / Silent switch towards the front of your iPhone 8.
How to Use the Ring/Silent Switch to Lock - iOS & iPhone
This new feature has been integrated within the app so users can simply send this useful data without much effort. You can not only send your current location to anyone over iMessage or SMS but you can also make the app continuously share this information with your desired contact for a certain amount of time.
How to share your location in iOS 8 - CNET
Get your marriage back on track with these tips. and it's likely they'll do the same right back for you. 5. Nurture yourself. Write it down if you need to, then start breaking the issues
How to Get Your Relationship Back on Track After a Terrible Fight
An Apple expert shows you how to restart an iPhone without the power button if your iPhone is running iOS 11. The process involves turning on the AssistiveTouch virtual Home button and tapping the
How Do I Restart An iPhone Without The Power Button? The Fix!
4 ways to make Siri smarter on your iPhone. the setup process again of training Siri to recognize your voice. however, teach Siri how to correctly pronounce names in your Contacts.
How to Pronounce Apple Siri iPhone Voice Directions Questions
Below, you'll also find a complete list of TV and sports networks (legally) available with an internet TV subscription service. (Jump to the chart.) If you don't care about the "legally" part, then you can use Kodi to stream virtually any channel or show for free, both live and on-demand, from any country.
Brian Lang's Latest Posts. News: Try These 5 Hot New Snapchat Lenses — The Simpsons, Playable Flappy Bird & More
News: Pinterest Updates Creepy Lens Feature, Now Recognizes
How to Customize the Boot Animation on Your HTC One
Automatically download TV Shows using RSS! How to Automatically download your favourite TV shows when they air using ShowRSS.Info and Utorrent. How to access all the latest TV and Movies for Free
Best way to watch Live TV on Kodi for free using addons and
0 comments:
Post a Comment